이전에 https://ming9mon.tistory.com/65 에서 만들었던 게시판을 수정하여 사용할 것이고,
파일 업로드를 구현한 후, 그다음 파일 다운로드를 추가로 구현할 것이다.
1. 파일 업로드
데이터베이스
이전에 사용했던 테이블은 제거하고 다음과 같이 새로 작성한다.
CREATE TABLE boardtest(
	idx int AUTO_INCREMENT PRIMARY KEY,
	writer VARCHAR(20) NOT NULL,
	title VARCHAR(30) NOT NULL,
	content TEXT NOT NULL,
	reg_date DATE NOT NULL,
	cnt int default 0,
	file_name varchar(40)
) DEFAULT CHARSET=utf8 ;
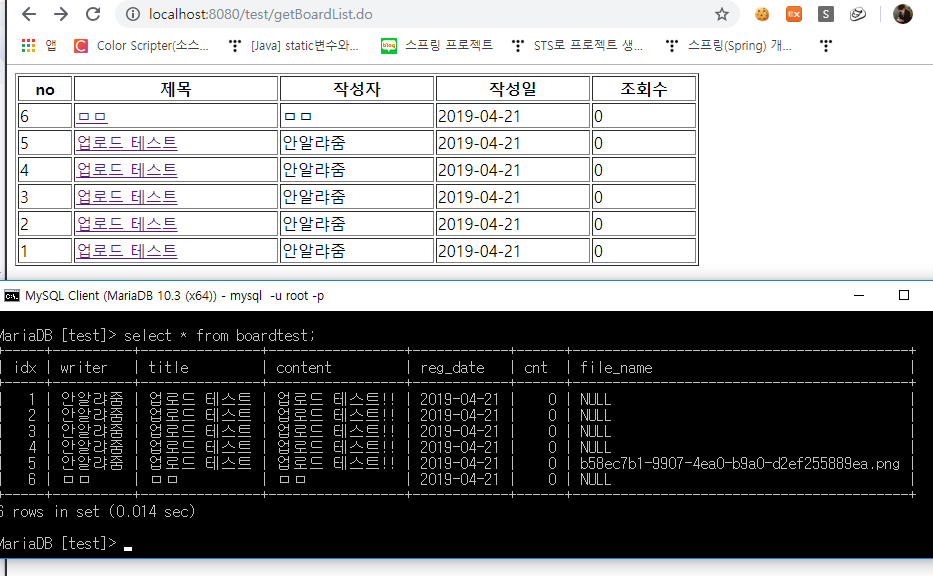
이전 테이블에서 추가된 항목은 file_name이다. 저장된 파일명을 저장시키기 위한 컬럼이다.
Dependencies 추가
pom.xml에 아래의 디펜던시를 추가해 준다.
		<!-- file upload -->
		<dependency>
			<groupId>commons-fileupload</groupId>
			<artifactId>commons-fileupload</artifactId>
			<version>1.3.1</version>
		</dependency>

		<!-- MultipartHttpServletRequset -->
		<dependency>
			<groupId>commons-io</groupId>
			<artifactId>commons-io</artifactId>
			<version>2.6</version>
		</dependency>
servlet-context.xml 수정
	<!-- 파일 업로드 설정 -->
	<beans:bean id="multipartResolver"
		class="org.springframework.web.multipart.commons.CommonsMultipartResolver">
		<!-- 파일 사이즈 설정 가능 byte 단위
		<property name="maxUploadSize" value="100000" />
		-->
	</beans:bean>
파일 업로드를 위한 bean을 추가로 작성해 준다. maxUploadSize로 업로드 시 maximum파일 사이즈를 지정할 수 있다.
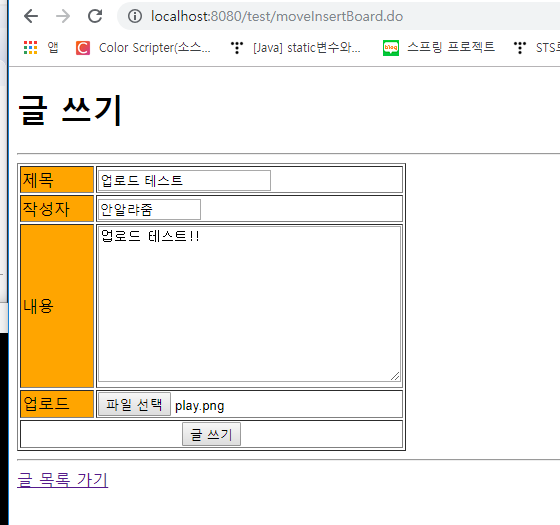
insertBoard.jsp 수정
이전에 만들었던 insertBoard에서 파일을 입력할 수 있도록 수정해 준다.
<%@ page language="java" contentType="text/html; charset=UTF-8" pageEncoding="UTF-8"%>
<!DOCTYPE html>
<html>
<head>
<meta charset="UTF-8">
<title>새글등록</title>
</head>
<body>
	<h1>글 쓰기</h1>
	<hr>
	<form action="insertBoard.do" method="post" enctype="multipart/form-data">
		<table border="1">
			<tr>
				<td bgcolor="orange" width="70">제목</td>
				<td align="left"><input type="text" name="title" /></td>
			</tr>
			<tr>
				<td bgcolor="orange">작성자</td>
				<td align="left"><input type="text" name="writer" size="10" /></td>
			</tr>
			<tr>
				<td bgcolor="orange">내용</td>
				<td align="left"><textarea name="content" cols="40" rows="10"></textarea></td>
			</tr>
			<tr>
				<td bgcolor="orange" width="70">업로드</td><td align="left">
				<input type="file" name="uploadFile"/></td>
			</tr>
			<tr>
				<td colspan="2" align="center"><input type="submit" value="글 쓰기" /></td>
			</tr>
		</table>
	</form>
	<hr>
	<a href="getBoardList.do">글 목록 가기</a>
</body>
</html>
이전 소스코드에서 바뀐 곳은 아래의 form과 새로운 file업로드 부분이다 enctype="multipart/form-data" 이 부분을 사용해 줘야지만 파일을 전송할 수 있다.
<form action="insertBoard.do" method="post" enctype="multipart/form-data">

<tr>
	<td bgcolor="orange" width="70">업로드</td><td align="left">
	<input type="file" name="uploadFile"/></td>
</tr>
Controller 수정
이전에 만들었던 컨트롤러에서 파일 업로드 처리할 부분을 추가해 줬다.
	// 글 쓰기
	@RequestMapping(value="/insertBoard.do")
	public String insertBoard(BoardVO vo) throws IOException {
			// 파일 업로드 처리
			String fileName=null;
			MultipartFile uploadFile = vo.getUploadFile();
			if (!uploadFile.isEmpty()) {
				String originalFileName = uploadFile.getOriginalFilename();
				String ext = FilenameUtils.getExtension(originalFileName);	//확장자 구하기
				UUID uuid = UUID.randomUUID();	//UUID 구하기
				fileName=uuid+"."+ext;
				uploadFile.transferTo(new File("D:\\upload\\" + fileName));
			}
			vo.setFileName(fileName);
			boardService.insertBoard(vo);
			return "redirect:getBoardList.do";
	}
UUID를 만들어 확장자와 붙여 서버와 DB에 저장하도록 바꾸었다.
저장 경로는 D드라이브 upload폴더로 지정하였는데 원하는 위치로 바꾸면 된다.
BoardController의 전체 소스는 다음과 같다.
package com.spring.test.controller;

import static org.springframework.test.web.servlet.result.MockMvcResultMatchers.request;

import java.io.File;
import java.io.IOException;
import java.util.List;
import java.util.UUID;

import javax.servlet.http.HttpServletRequest;

import org.apache.commons.io.FilenameUtils;
import org.springframework.beans.factory.annotation.Autowired;
import org.springframework.stereotype.Controller;
import org.springframework.ui.Model;
import org.springframework.web.bind.annotation.ModelAttribute;
import org.springframework.web.bind.annotation.RequestMapping;
import org.springframework.web.bind.annotation.RequestMethod;
import org.springframework.web.bind.annotation.RequestParam;
import org.springframework.web.bind.annotation.SessionAttributes;
import org.springframework.web.multipart.MultipartFile;

import com.spring.test.domain.BoardVO;
import com.spring.test.service.BoardService;

@Controller
@SessionAttributes("board")
public class BoardController {
	@Autowired
	private BoardService boardService;

	//글 목록 검색
	@RequestMapping("/getBoardList.do")
	public String getBoardList(BoardVO vo, Model model) {
		 List<BoardVO> boardList = boardService.getBoardList();

		// Model 정보 저장
		model.addAttribute("boardList",boardList);
		return "boardList"; // View 이름 리턴
	}

	// 글 상세 조회
	@RequestMapping("/getContent.do")
	public String getBoard(BoardVO vo, Model model) {
		model.addAttribute("board", boardService.getContent(vo)); // Model 정보 저장
		return "content"; // View 이름 리턴
	}

	// 글 쓰기
	@RequestMapping(value="/insertBoard.do")
	public String insertBoard(BoardVO vo) throws IOException {
			// 파일 업로드 처리
			String fileName=null;
			MultipartFile uploadFile = vo.getUploadFile();
			if (!uploadFile.isEmpty()) {
				String originalFileName = uploadFile.getOriginalFilename();
				String ext = FilenameUtils.getExtension(originalFileName);	//확장자 구하기
				UUID uuid = UUID.randomUUID();	//UUID 구하기
				fileName=uuid+"."+ext;
				uploadFile.transferTo(new File("D:\\upload\\" + fileName));
			}
			vo.setFileName(fileName);
			boardService.insertBoard(vo);
			return "redirect:getBoardList.do";
	}

	// 글 쓰기 페이지 이동
	@RequestMapping("/moveInsertBoard.do")
	public String moveInsertBoard()throws Exception{
		return "insertBoard";
	}


	// 글 수정
	@RequestMapping("/updateBoard.do")
	public String updateBoard(@ModelAttribute("board") BoardVO vo) {
		boardService.updateBoard(vo);
		return "redirect:getBoardList.do";
	}

	// 글 삭제
	@RequestMapping("/deleteBoard.do")
	public String deleteBoard(BoardVO vo) {
		boardService.deleteBoard(vo);
		return "redirect:getBoardList.do";
	}
}
VO 수정
BoardVO에서 fileName과 uploadFile을 추가해 getter와 setter를 작성한다.
	private String fileName;
	private MultipartFile uploadFile;

	public MultipartFile getUploadFile() {
		return uploadFile;
	}
	public void setUploadFile(MultipartFile uploadFile) {
		this.uploadFile = uploadFile;
	}
	public String getFileName() {
		return fileName;
	}
	public void setFileName(String fileName) {
		this.fileName = fileName;
	}
전체 소스
package com.spring.test.domain;

import java.util.Date;

import org.springframework.web.multipart.MultipartFile;

public class BoardVO {
	private int idx;
	private String title;
	private String writer;
	private String content;
	private Date regDate;
	private int cnt;
	private String fileName;
	private MultipartFile uploadFile;

	public MultipartFile getUploadFile() {
		return uploadFile;
	}
	public void setUploadFile(MultipartFile uploadFile) {
		this.uploadFile = uploadFile;
	}
	public String getFileName() {
		return fileName;
	}
	public void setFileName(String fileName) {
		this.fileName = fileName;
	}
	public int getIdx() {
		return idx;
	}
	public void setIdx(int idx) {
		this.idx = idx;
	}
	public String getTitle() {
		return title;
	}
	public void setTitle(String title) {
		this.title = title;
	}
	public String getWriter() {
		return writer;
	}
	public void setWriter(String writer) {
		this.writer = writer;
	}
	public String getContent() {
		return content;
	}
	public void setContent(String content) {
		this.content = content;
	}
	public Date getRegDate() {
		return regDate;
	}
	public void setRegDate(Date regDate) {
		this.regDate = regDate;
	}
	public int getCnt() {
		return cnt;
	}
	public void setCnt(int cnt) {
		this.cnt = cnt;
	}


	@Override
	public String toString() {
		return "BoardVO [idx=" + idx + ", title=" + title + ", writer=" + writer + ", content=" + content + ", regDate="
				+ regDate + ", cnt=" + cnt + ", fileName=" + fileName + "]";
	}


}
Mapper 수정
file명을 저장할 수 있도록 insertBoard부분을 수정해 준다.
	<select id="insertBoard">
		<![CDATA[
		INSERT INTO boardtest(title,writer,content,reg_date,file_name)
		VALUES(#{title}, #{writer}, #{content}, now(), #{fileName})
		]]>
	</select>
여기까지 하면 업로드 구현은 완성하였다.


2. 다운로드 구현
FileDownController 작성

package com.spring.test.controller;

import java.io.File;
import java.io.FileInputStream;
import java.io.OutputStream;
import java.io.UnsupportedEncodingException;
import java.net.URLEncoder;

import javax.servlet.http.HttpServletRequest;
import javax.servlet.http.HttpServletResponse;

import org.springframework.stereotype.Controller;
import org.springframework.web.bind.annotation.RequestMapping;

@Controller
public class FileDownController {

    @RequestMapping(value = "fileDownload.do")
    public void fileDownload4(HttpServletRequest request,HttpServletResponse response) throws Exception {
        //String path =  request.getSession().getServletContext().getRealPath("저장경로");

        String filename =request.getParameter("fileName");
        String realFilename="";
        System.out.println(filename);

        try {
            String browser = request.getHeader("User-Agent");
            //파일 인코딩
            if (browser.contains("MSIE") || browser.contains("Trident")
                    || browser.contains("Chrome")) {
                filename = URLEncoder.encode(filename, "UTF-8").replaceAll("\\+",
                        "%20");
            } else {
                filename = new String(filename.getBytes("UTF-8"), "ISO-8859-1");
            }
        } catch (UnsupportedEncodingException ex) {
            System.out.println("UnsupportedEncodingException");
        }
        realFilename = "D:\\upload\\" + filename;
        System.out.println(realFilename);
        File file1 = new File(realFilename);
        if (!file1.exists()) {
            return ;
        }

        // 파일명 지정
        response.setContentType("application/octer-stream");
        response.setHeader("Content-Transfer-Encoding", "binary;");
        response.setHeader("Content-Disposition", "attachment; filename=\"" + filename + "\"");
        try {
            OutputStream os = response.getOutputStream();
            FileInputStream fis = new FileInputStream(realFilename);

            int ncount = 0;
            byte[] bytes = new byte[512];

            while ((ncount = fis.read(bytes)) != -1 ) {
                os.write(bytes, 0, ncount);
            }
            fis.close();
            os.close();
        } catch (Exception e) {
            System.out.println("FileNotFoundException : " + e);
        }
    }
}
jsp파일에서 다운받을 파일명을 받아와 스트림으로 전송해 준다.
Content.jsp
<%@ page language="java" contentType="text/html; charset=UTF-8"
pageEncoding="UTF-8"%>
<%@taglib uri="http://java.sun.com/jstl/core_rt" prefix="c"%>
<%@taglib uri="http://www.springframework.org/tags" prefix="spring" %>
<%@taglib uri="http://java.sun.com/jsp/jstl/fmt" prefix="fmt" %>
<!DOCTYPE html>
<html>
<head>
<meta charset="UTF-8">
<title>글 상세</title>
</head>
<body>
<h1>글 상세</h1>
<hr>
<form action="updateBoard.do" method="post">
<input name="seq" type="hidden" value="${board.idx}" />
<table border="1">
<tr>
<td bgcolor="orange" width="70">제목</td>
<td align="left"><input name="title" type="text"
value="${board.title }" /></td>
</tr>
<tr>
<td bgcolor="orange">작성자</td>
<td align="left">${board.writer }</td>
</tr>
<tr>
<td bgcolor="orange">내용</td>
<td align="left"><textarea name="content" cols="40" rows="10">${board.content }</textarea></td>
</tr>
<tr>
<td bgcolor="orange">등록일</td>
<td align="left"><fmt:formatDate value="${board.regDate }" pattern="yyyy-MM-dd"/></td>
</tr>
<tr>
<td bgcolor="orange">조회수</td>
<td align="left">${board.cnt }</td>
</tr>
			<c:if test="${board.fileName ne null}">
			<tr>
				<td bgcolor="orange">첨부파일</td>
				<td align="left"><a href="fileDownload.do?fileName=${board.fileName}">${board.fileName}</a></td>
			</tr>
			</c:if>
<tr>
<td colspan="2" align="center"><input type="submit" value="글 수정" /></td>
</tr>
</table>
</form>
<hr>
<a href="moveInsertBoard.do">글 쓰기</a>
<a href="deleteBoard.do?idx=${board.idx }">글 삭제</a>
<a href="getBoardList.do">글 목록</a>
</body>
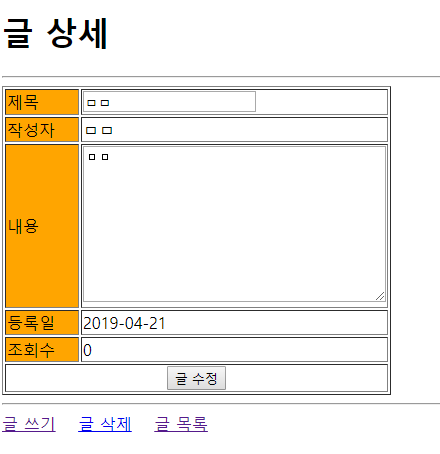
</html>JSP파일에 아래의 내용을 추가시켜 파일이 있을경우 첨부파일이 보이도록 한다.
<c:if test="${board.fileName ne null}">
<tr>
<td bgcolor="orange">첨부파일</td>
<td align="left"><a href="fileDownload.do?fileName=${board.fileName}">${board.fileName}</a></td>
</tr>
</c:if>

'프로그래밍 > 스프링 & 스프링 부트' 카테고리의 다른 글
| 스프링 jQuery로 게시판 글쓰기 만들기 (0) | 2019.05.13 |
|---|---|
| 스프링 MyBatis Oracle DB 연동 (0) | 2019.05.10 |
| 스프링 게시판 만들기1 (4) | 2019.04.20 |
| Spring MariaDB 연동 (MyBatis 사용) (8) | 2019.04.16 |
| 리눅스로 스프링 프로젝트 보내기(WAR파일 배포) (0) | 2019.04.15 |


